Research Data Storage
By C.Du @snail123815 & Joost Willemse @Karivtan
Research Drive is a cloud-based platform that enables researchers to securely store, share, and collaborate on data, and serves as an essential RDM tool for complying with the IBL RDM policy.
Direct access URL
Leiden University Research Drive (Nextcloud interface) - https://universiteitleiden.data.surfsara.nl/
Topics not covered in this page
Setting Up Local Sync — Install and configure the Nextcloud desktop client to sync files with your local computer, including virtual files setup.
Managing Local Files — Remove shared folders, manage local storage space, transfer large files from network drives, and resolve Windows long path issues.
Upload Large Files — Step-by-step guide to upload large files from a network drive or USB storage without needing to copy them to your computer first, and how to remove the sync connection afterward.
Command Line Upload with
rclone— Usercloneto sync files from/to Research Drive using command line, which can be especially useful for Linux users on IBL servers or ALICE.
Intended structure
Quick reference for the intended Research Drive folder structure.

Nextcloud and Research Drive
Nextcloud is the software platform that powers Research Drive. It provides a user-friendly interface for managing files and folders, as well as features for sharing and collaboration. The Nextcloud desktop client allows you to sync files between your local computer and Research Drive, enabling you to access your data from anywhere with an internet connection.
Application and invitation
To gain access to Research Drive, you always need to be invited. ISSC will create project folders upon request of PIs or lab managers, and then the PI or lab manager can invite the rest of the staff and students. If you do not have access to any project folder, please contact your PI or lab manager.
Requesting a project folder by PI or lab manager:
Research Drive is now a paid service, please consult IBL RDM team for the cost and funding details.
Request Research Drive per project/DMP/contract
Go to “Research support” → “Research Drive” → “Request Research Drive”
Choose “No” for DMP, always use a cost centre number in the field “SAP number:”, ISSC has stopped DMP-based funding.
Mention the project folder name you want to create in “Comment:” field
Invite your lab manager if you do not want to manage the Research Drive yourself. Give your lab manager full access to all your project folders, then the lab manager can then invite the rest of the staff and students and manage the major folder shares.
See Invite users and set up the folder structure: section for details.
For PhD/PostDoc/Researcher (staff)/student, once you received the invitation, please follow the link and confirm you can login. Only after that, your PI or lab manager can give you access to your folder.
Project folder name may not be consistent
Example:

Note in this example, NIOO_4 is actually showing information forIBL_G_Van_Wezel folder.
You can rename a project folder in the Files tab, but the Dashboard name will not change (it reflects the owner’s original name). If renaming is necessary, include an abbreviation of the original name, e.g. “New_name_0cnf_opn” (for “changed name from old project name”), so it remains identifiable. Also avoid lengthy path problems.
Invite users and set up the folder structure
After Research Drive has been activated, follow these steps to set up your project folder, invite users. This tutorial assumes you already have a project folder (if you are a PI) or have been invited to access at least one folder (if you are staff or student). If you do not have access to any project folder, please contact your PI or lab manager.
PI or authorized lab manager have full control over the project folder, you can decide how to organize the folder structure and who can access which folders. We recommend the following basic structure, but you can adjust it according to your needs:
Anyone with a Research Drive account can invite other users include:
Staff: PhD students, PostDocs, Researcher (staff), Lab managers
Students: Master students, Bachelor students, Interns
External collaborators: collaborators from other institutions, they can be invited using their external email address, but they will be prompted to create their own eduID account or use the account from their institute (if present in the system) before they can log in. If you share with “Allow download and sync” enabled (not equal to allowing “Edit”), they can access the files just like internal users, including via command line
rcloneand Nextcloud desktop client.
Steps:
Logs in to Research Drive
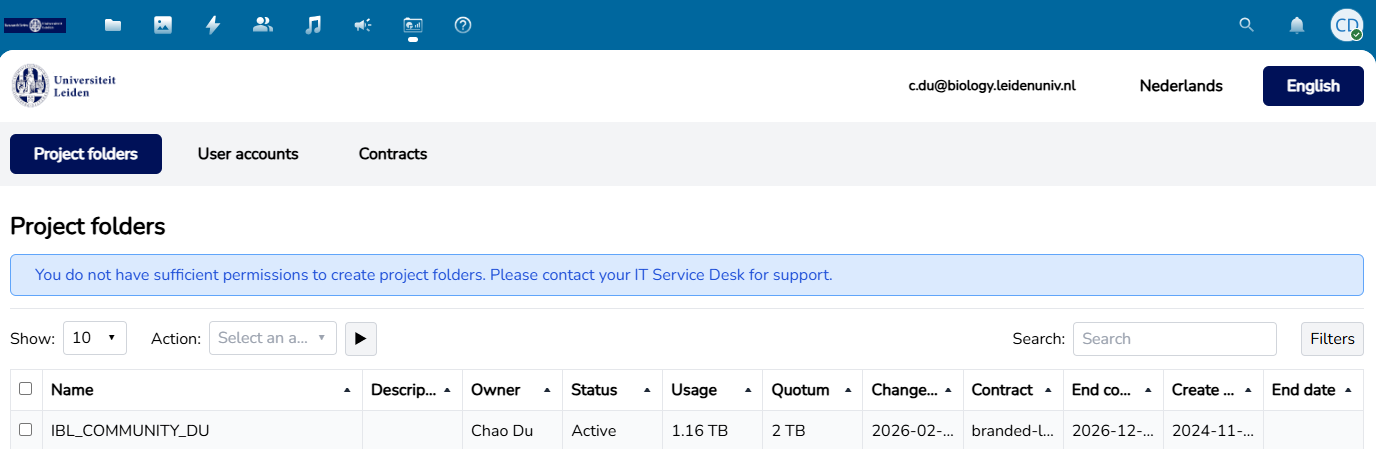
Go to the dashboard (top-left icon row, second icon from right)
First-time login
Expect multiple login prompts and a missing project folder the first time you log in. This is because some things are only set up when you start using Research Drive. The project folder should appear a few minutes later.
It is normal to have zero space
The University admin is the owner of all project folders, not yourself, even if you are a PI. So you do not “own” any space on Research Drive, this is normal. The project folder is shared with you, not counting as your own space.
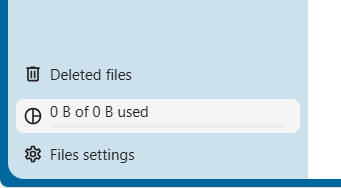
But you do see your Usage and Quotum on your “Dashboard” → “Project folders” page. You may see the message “You do not have sufficient permissions to create …”. This is normal as well: project folders can only be created by ISSC upon request.
Go to “Dashboard” → “User accounts” and invite all users, both staff and students, using their university email address (for example the @biology mail for employees).
For students without an university email address, you can use their personal email address, but make sure to inform them to check their inbox and confirm the invitation. For external collaborators, you can invite them using their external email address. They must first create their own eduID account or use the account from their institute (if present in the system) before they can log in.
Once the first several staffs finish setting up, they can invite the rest of the staff and students.
Invite users using their university email address, for example the @biology mail for employees
External users can gain access when you invite their external email address. They will be prompted to create their own eduID account or use the account from their institute (if present in the system) before they can log in.
Go to the Files tab (top left), and go into your project folder
Create a folder for everyone in this project
Setup share with users
The user needs to already accepted the invitation and can log in to Research Drive web interface before you can share the folder with them. It is recommended to follow the intended folder structure and share the folders accordingly.
Here is how to share a folder with specific users:
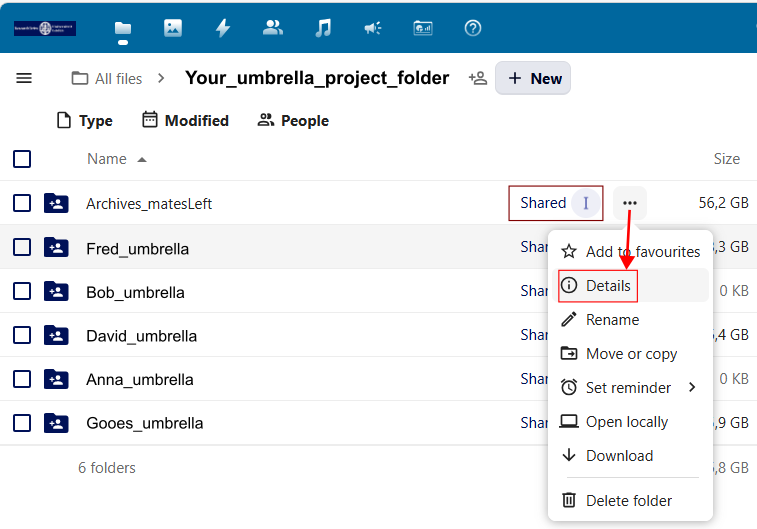
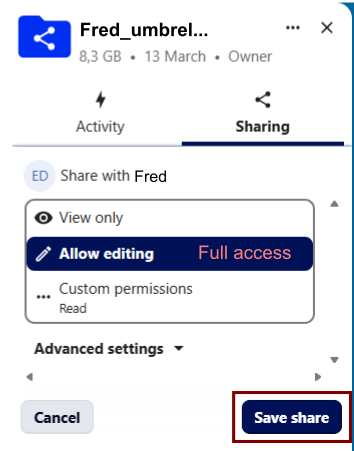
Go to the Files tab, locate the target folder, and click the “Shared” button, or click the “…”(three dots) button and select “Details” from the dropdown menu.
Make sure the pop-up shows the correct folder name, click “Sharing” tab if not already selected
In Internal shares section, search and add the correct users (or team name if you already created one), and set permissions to allow editing (for their own folder only).
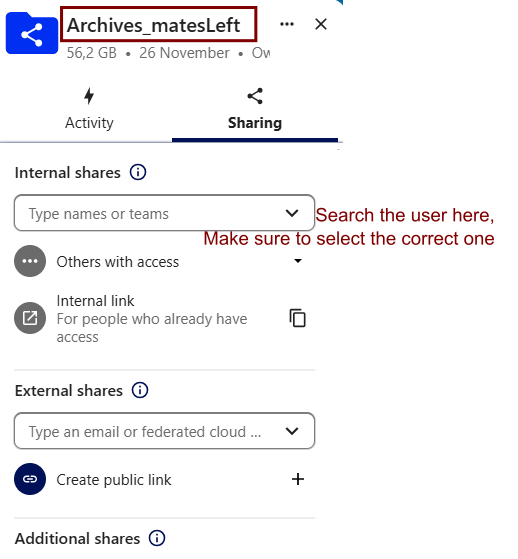
Remember to click Save Share after adding each user.
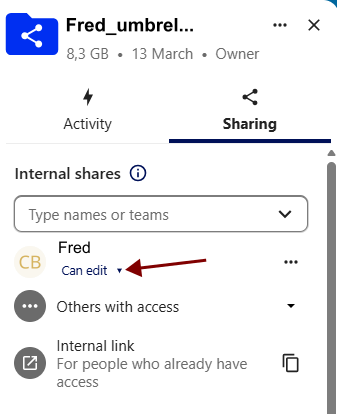
After saving, it should show the user added.
Upload only folder
For folders that are meant for users to upload files but not edit or delete files, you can set the permission to “Create” only. This way, users can only upload files to this folder, but cannot edit or delete any files in it.

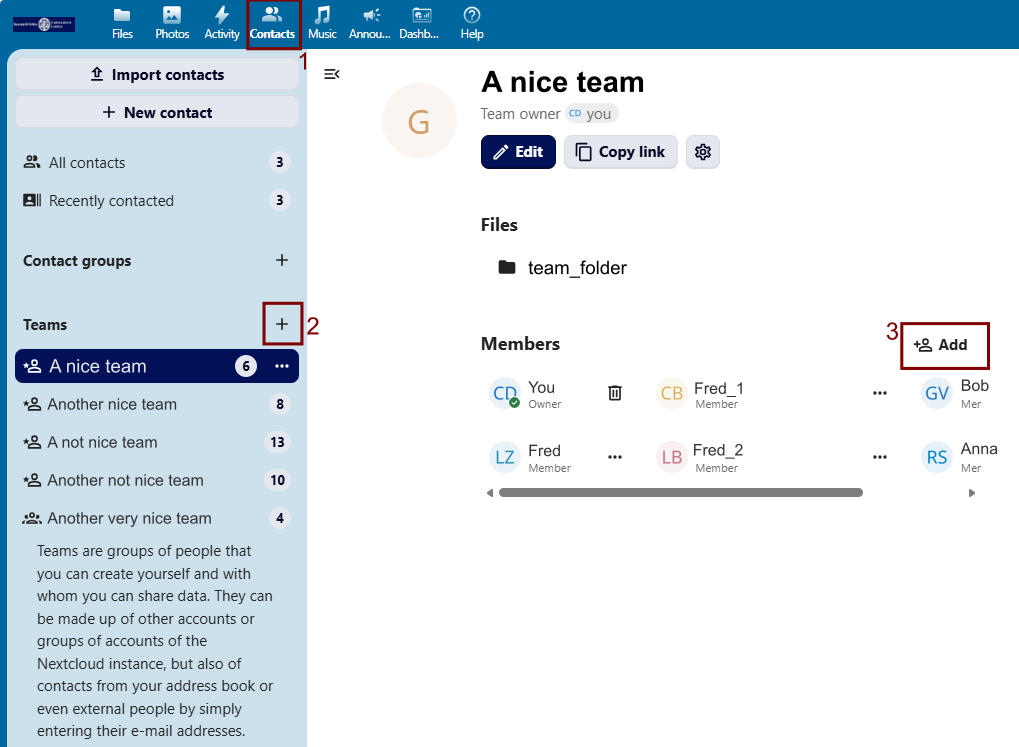
Share with a group of users
If you want to share a folder with a group of users, you can create a team in “Contacts” card, then share the folder with that team. This way you only need to manage the team membership, and the sharing will be automatically updated.
Expand storage space
By default, each application creates a project folder with 0.5 TB of storage space. If you need more space, please specify the required storage size and the reason in the “Comment:” field when applying for Research Drive.
To expand existing project folder, please:
Go to “Research support” → “Research Drive” → “Ask a question”
Fill the desired space you want to expand
Explain how would you like to pay for the extra space, for example by mentioning the cost centre of the project that will cover the cost.
Different sizes in Dashboard and Files
Confusion will arise when checking your storage usage.
In “Files” page, Research Drive uses binary prefixes, although it is showing TB/GB, but it actually show numbers in TiB and GiB.
1 TiB = 240 bytes = 1024 GiB; 1 GiB = 230 bytes = 1024 MiB.
In “Dashboard” page, it uses decimal prefixes
1 TB = 1012 bytes = 1000 GB; 1 GB = 109 bytes = 1000 MB.
1 TB (decimal, “Dashboard”) is approximately 0.91 TiB (binary, “Files”), 2 TB = approximately 1.82 TiB.
1 GB (decimal, “Dashboard”) is approximately 0.93 GiB (binary, “Files”), 500 GB = approximately 465.66 GiB.
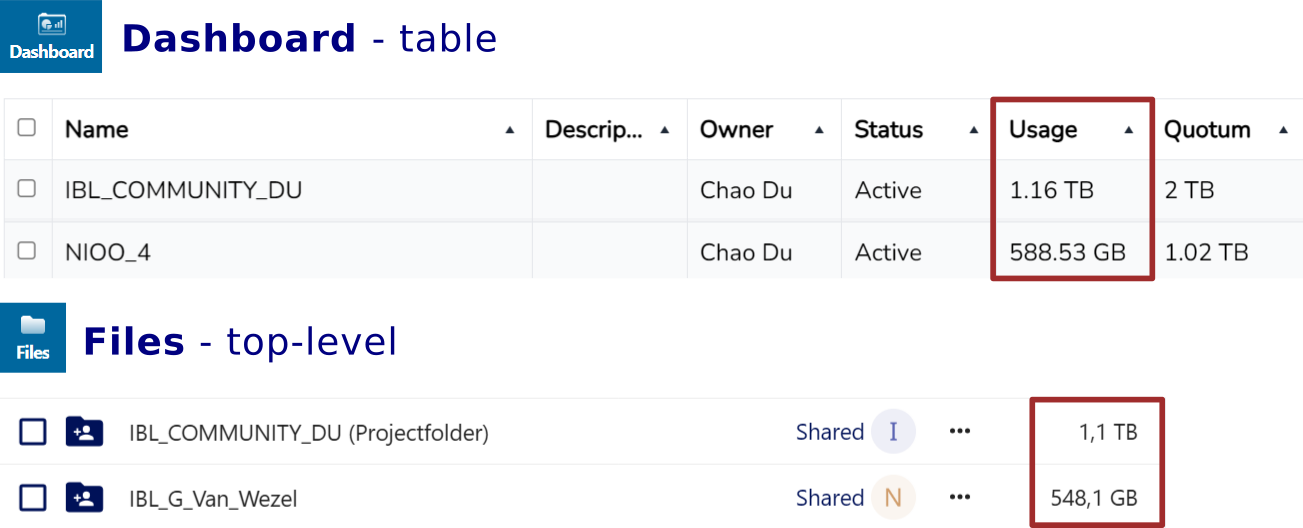
In this example, 1.16 TB in the “Dashboard” table is actually 1.06 TiB, which rounds up to 1.1 TB in “Files” page. 588.53 GB in “Dashboard” is actually 548.1 GiB. The “Files” page is more accurate for checking the actual size of your files, while the “Dashboard” page is more accurate for checking your quota.
Quota is calculated using decimal prefixes. So the “Dashboard” page is more accurate for checking your quota, while the “Files” page is more accurate for checking the actual size of your files. If you are close to your quota, consider archiving files to long-term storage or requesting more storage.
There is some delay in showing the actual usage in your Dashboard after you upload or delete files.